


My love relationship with KonfHub contest #azuredevstories
Konfhub conducted a technical blogging contest cum learning program where all the participants had to complete any one of the MS Learn tracks. I have completed the Python on Azure track in it. The initiative’s goal is to skill developers to learn new technologies on MS Learn and create content sharing their experiences building on Azure.
Photo by Joshua Aragon on Unsplash
To understand the Azure App service better, I have created a simple FAST API application deployment to Azure.
dini-rockz93/FastAPi_azure
Creating a FAST API service on azure. Contribute to dini-rockz93/FastAPi_azure development by creating an account on…github.com
Prerequistes:
- Azure Account
- Github Account(with knowledge of any framework)
- Basic Knowledge of Git
Step 1: Create an app service on Azure
Go to portal.azure.com and sign in(or signup if you don’t have one). Click on “Create a resource” from the left sidebar.


Search for “Web App” and click on it.


And fill out the details as shown below and as per your account settings ( Note: You might get charged for some of the resources you create while replicating this tutorial).
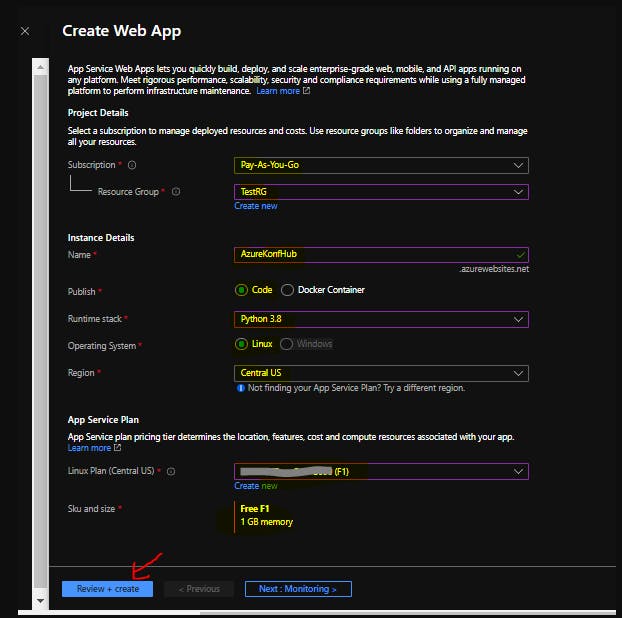
Subscription: Existing Subscription name.
Resource Group: Create new and name it (in my case it’s ”TestRG” which is already an existing resource group).
Name: App Name of your choice
Publish: Choose ‘Code’.
Runtime stack: Pick ‘Python 3.8’.
Operating System: Pick ‘Linux’
Region: Pick ‘Central US’ or any other region where the F1 App Service Plan tier is available.
App Service Plan::
Linux Plan(Central US): Create a new plan (in my case it’s already existing/you might have to create a new one.)
SKU and size: Free F1 (1 GB memory) [Pick this size]
Hit Review and Create and after the validation, hit Create button. It might take a while to deploy the needed resources by Azure.
Step 2: Configuring Deployment settings of App Service
Once the deployment process is complete, you could see the previously created App Service in your Azure Dashboards All Resources tab.
Click on that resource and go to the deployment center in resource sidebar.
Select Github as the Source Control Provider. If you haven’t Authorized Github from Azure, it will open up a new window by asking you to authorize.
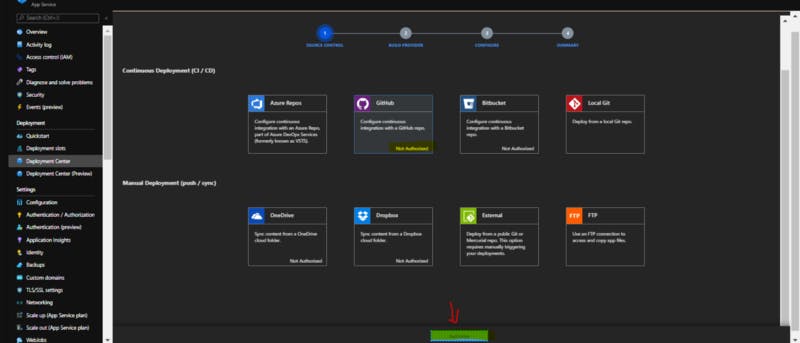

Hit Authorize by providing your Github Credentials and hit ‘Authorize/Approve’.
Upon closing of GitHub Authorization, you can see the ‘Continue’ option in Azure like in the above image. After that, you will be taken to select Build Provider widget.
Select ‘Kudu’ as your build provider and hit ‘Continue’ again.
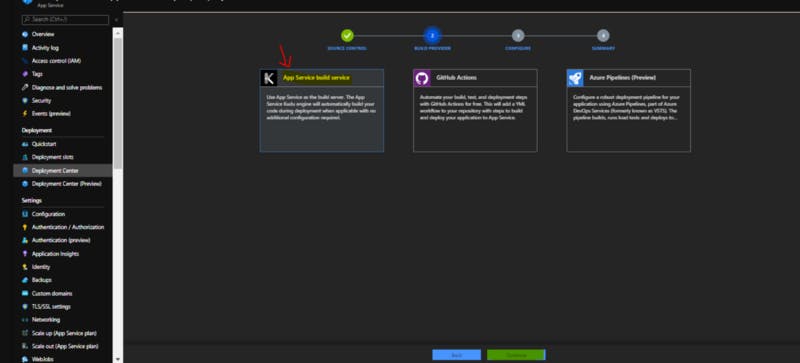
You will be taken to Configure Tab to select the respective repo in your GitHub account that you want to publish to Azure App Service.
Note: If you don’t have a Python-based Web App in your GitHub, fork it from here And then, use that to deploy into Azure App Service.
And click ‘Continue’ and you will be taken to the final step of deployment configuration which is reviewing the Summary. You can see which repository is going to pushed to App Service in here.
The best part of this is you can, even more, optimize App Service Plans in Azure to make sure there are multiple deployment slots for different purposes. For example, there could be a production deployment slot and a staging deployment slot in the same App Service if configured effectively.
That’s how we can configure and deploy a python based web app from GitHub Repos to Azure within no time.

Photo by Rendy Novantino on Unsplash
This is my first try in Azure, let me know for any points of improvements
Edit: Don’t forget to delete the resource once you’re done with the work
az resource delete — verbose — id
Final words
With this technical blogging contest by KonfHub, I firmly believe every software Engineer will engulf the practice of reading the documentation/blogs/articles/references, which helps explore the professional way of dealing with errors. Thank you, KonfHub, for this exquisite experience.